Hikvision Firmware Upgrade Guide
1. General Information
1.1 Service goal
Most of Hikvision products offer the
possibility to upgrade the factory default software under certain conditions.
By doing this, it is much easier to obtain the extra services of the upgraded
systems, and to fix possible bugs.
1.2 Important Information
All customers should upgrade their
software at their own risk. An improperly conducted upgrade can lead to the irreversible
malfunction of the equipment. We cannot assume responsibility for the damages of
an improperly conducted upgrade. If you are not sure about the process or the
sequence of the firmware upgrade, please contact our support team. Repairing
damages caused by an improperly conducted upgrade is not covered by the
warranty. In such a case, please contact our Service Center.
During the upgrade process, do not
turn off the equipment, do not plug off the cables and do not pull out microSD
card/hard disk.
Firmware are digicap.dav or
digicap.mav files that unpack the zip files (if you received/downloaded the
firmware in such format). The properties of the equipment will be saved only if
the firmware upgrade is newer than the current version. If we install an
earlier firmware version, our saved properties will be lost.
After a firmware upgrade, we suggest setting
the device to its default settings for stable functioning.
1.3 Firmware upgrade sequence
Devices with an older firmware
versions cannot be upgraded to the latest version directly! The major version upgrades
have to be installed gradually (they are available on the website, or were sent
to you).
Example: current version: 3.4.81 new
firmware: 4.1.6
In this case, the following versions
need to be installed:
3.5->3.6->xx->4.0->4.1 (Not
all versions are necessarily available. In some cases, v3.4 may be followed by a
v4.1).
1.4 Firmware availability
1.4.1 Hikvision website (at your own risk)
Visit the Hikvision site and type the product’s name or description into the search
bar. You can download the latest version after opening the product’s profile
page from the Download Center\Firmware menu points.
In all cases, choose the Firmware
For Europe Download menu. There are some specific firmware versions for
different regions, but they can lead to malfunctioning!
1.4.2 Hikvision download page (at your own risk)
- Firmware versions can be
downloaded from the Hikvision download page.
Choose the desired category and the Product
Firmware folder.
Products are separated by platform
on each page. Specific product platforms can be found on a constantly upgraded
table file at the bottom of the folder structure. (For example: in case of IP cameras:
04 (Limited)IPC Models of Different
Platforms_191209.xlsx )
After downloading and opening the
table, choose the right tab (at the bottom) and search (CTRL+F) the product
code. It will show the right platform in the top row.
1.4.3 Riel support
- Ask for the latest firmware
version from our engineer team, using the support@riel.hu email address. In the email, please send the exact
name/code, type and current firmware version of the product.
2. Conditions and Tools for Upgrading
There are 3 methods for an upgrade. There
are different conditions for the action depending on the method.
Through the local menu (this only works with recorders). Required tools:
- Monitor, mouse
- Firmware file on a USB flash drive
Through web browser. Required
tools:
- PC with an ethernet plug,
- Firmware file,
- Browser (Mozilla Firefox with the right plug-in patch)
Through iVMS-4200 client software.Required tools:
· PC
with ethernet plug,
· Firmware
file,
- iVMS-4200 client software.
3. Upgrading Process
3.1 Upgrading through the local menu
Open the local menu. To do this, press
a right-click on the home screen.
Change the password after the first use!
Navigate to Maintenance -> Upgrade
-> Local upgrade menu.
Plug in the storage device that
contains the firmware, and click the “upgrade” button in the top right
corner.
Select the desired Firmware, then
click “upgrade” in the bottom left corner! The device will automatically
run the upgrade process and verifies it after rebooting. The upgrade process
can only be done with the firmware for that particular device. The system does
not allow the installation of other firmware.
In the Maintenance ->
Import/Export menu we can export our parameters to the USB stick after
the upgrade.
Go to Maintenance -> Default sub-menu
and click the "Withdraw inactive status" button.
After activation, upload our
parameters on the above-mentioned Import/Export tab.
After a firmware upgrade, we suggest
to set the device to default in every case, to ensure stable functioning!
3.2 Upgrading Through a Web Browser
Plug the Hikvision device to the LAN
or directly into the PC’s ethernet port.
Open the browser, and type the IP
address of the Hikvision device into the address bar. Important: The
PC’s IP address should be in the same range as the Hikvision device! Eg.: if
the PC is 192.0.0.64 then the camera can be 192.0.0.128. (only the last section
is different)
In the menu navigate to Configuration -> Basic/Advanced
settings -> System -> Maintenance menu!

Click the web browser in the remote upgrade
section click , and navigate to the folder where the firmware is located, then
click on it. Important: the firmware should not be deeper than 3 levels
down in the folder structure.
Click the upgrade button. The
device will automatically run the upgrade and validated it after a reboot. The upgrade
can only be done with the firmware that particular device. The system does not
allow firmware that were made for other devices.
After rebooting, save our parameters
by clicking the “device parameters” button, then the “default” button, to bring our device to its factory default settings.
After activation: under the headline
“Import config. file” click the “browse” button and find the saved file.
After a firmware upgrade, we suggest
setting the device to default settings to ensure stable functioning!
3.3 Upgrading Via the iVMS-4200 Client
Software
Attach the Hikvision device to the
LAN network, or directly to the PC, on an ethernet port.
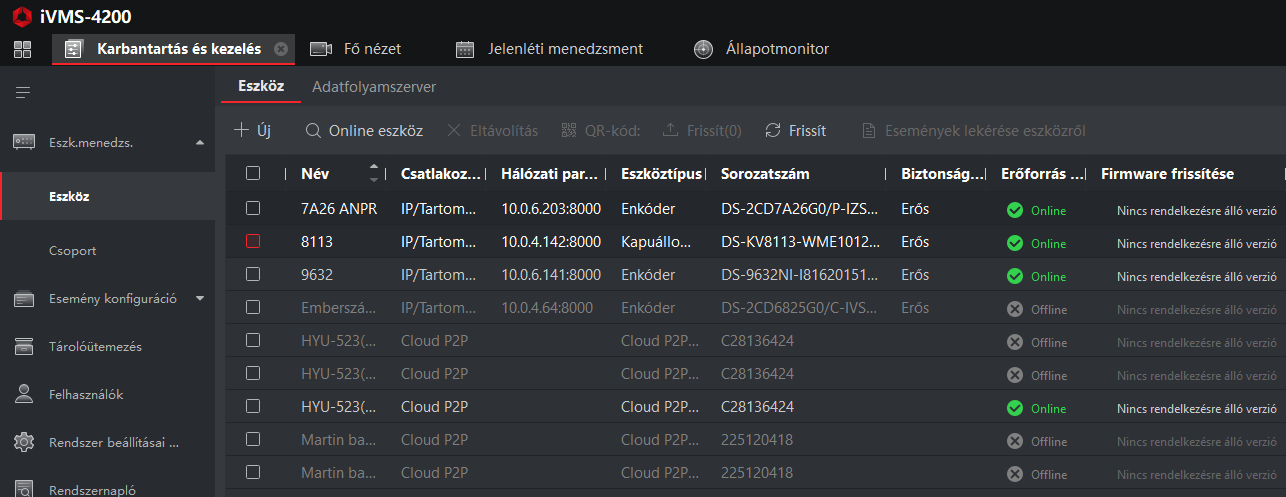
Start iVMS-4200 client software. Navigate
to Maintenance and Management -> Device management ->
Device menu
In the online device window double click
the device you want to upgrade.

Navigate to System ->
System maintenance menu.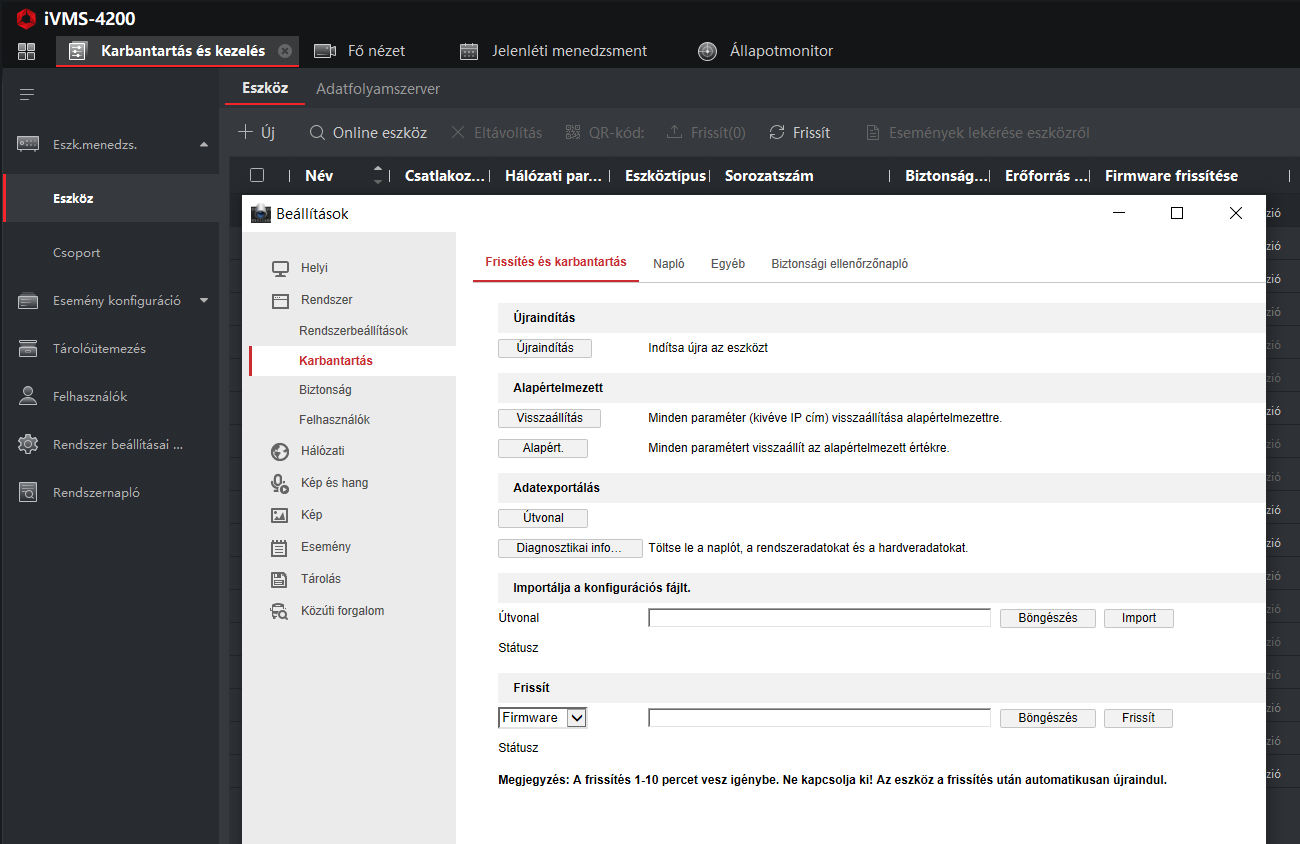
Click the …/browse icon and find the
required firmware. IMPORTANT: the file should not be more than 3 folders deep
in the folder structure! Click the “upgrade/refresh” button! The device will automatically run and validate the upgrade after a reboot. The upgrade
can only be done with a firmware dedicated to that particular device. A
firmware intended for another device will be rejected by the system.
After the reboot, save the
parameters by clicking the “Config file export” button, then the ”restore
all” button to bring the device to its factory default settings.
After the activity, reset the device
IP address, then within the remote configuration, import our parameters by
clicking the “Import config file”.
After a firmware upgrade, we suggest
setting the device to default settings to ensure stable functioning!
4. Known Problems and Issues
If the upgrade is canceled because
of a transmission problem the device may become faulty. In that case, send the
device to our repair center for fixing.
Similarly, skipping a major firmware
release version in the process can lead to the device failing to boot or
function properly. In this case, we also suggest sending the camera back to our
repair center.